|
Why is homemade soap good for you? It’s relatively simple to make, and you can be as creative and colorful as you wish with your recipes. For me, its something I remember from my childhood. I’m sure many of you remember sticking your hand in your pants pockets as a child and finding the last sliver of lye soap that your mom or grandmother used for the laundry.
In addition to making these enormous blocks of soap, they rendered lard to make it. That required collecting the fat from a butchered animal and heating it until it became liquid. The “cracklings” rose to the surface and were skimmed off. The bright white and creamy lard was canned for storage in the root cellar. Lye is a critical ingredient in soap. Many people are afraid of the process of using lye, but it is necessary for saponification. The lye solution chemically changes the molecular structure of the oils to create the bar and the lather. Yes, you need to be careful when handling lye. Use the proper tools and common sense. Saponification also creates a naturally occurring glycerin and other good stuff. Industrial soaps are not real soap but instead cleansing bars, meaning that the glycerin (which is good for your skin) has been mined out and resold as a separate ingredient. Real soap is made from lye and oils, including things like lard, coconut oil, sunflower and canola oil. You can also add things like honey, herbs, coffee, oats, natural colors, etc. Real soap leaves behind little soap scum and is very gentle on your skin. Read the labels, very few bars of soap say it is soap. Over the weekend, I whipped up a large batch of turmeric-colored lemongrass scented soap. Soap needs time to cure, so when my stash begins to run out, I have to make a new batch at least a month before the last little sliver disappearing down the drain. When researching Ewiger Saatz, many women I interviewed talked about how their moms made soap. There were several recipes submitted to me, including some scans of handwritten soap recipes. It was a given that you knew how to render. There were recipes for bread and cookies that used he “cracklings” harvested from your render. Yes, I do render lard. I then use a lye calculator from www.thesoapcalculator.com to enter the amounts of oils I wish to use plus any add-ins and the amount of super-fatting. Super-fatting ratios determine how hard the bars will be when dry. Here are a few recipes I have collected over the years in researching the Germans from Russia and how they lived. They have not been edited, but remain faithful to the original. Homemade Soft Soap (This was for white clothes) Recipe from Joyce Giedt and Jane Giedt Kirby originally from their grandmother Mrs. Jacob (Christine) Wageman from Ashley. DIRECTIONS: Melt 6-1/2 cups lard or tallow and cool. Fill a 5-gallon crock 2/3 full with cold water. Pour 1 can lye into crock and stir with wooden stick while pouring. When lye is dissolved, add the lard while stirring. To this, add 1 cup ammonia and 2 cups Wisk liquid detergent. Fill the crock with cold water. Stir about 5 or 6 times during the day. It will start to set the second or third day; then do not stir anymore. Dip this soap into the washer with a cup or wooden spoon. About 2 cups per washer load of clothes. Homemade soap Recipe submitted by Carol (Marquart) Mock, Napoleon, Logan County. INGREDIENTS: 6 ½ pounds melted lard 1 can lye 5 gallons water 1 cup ammonia 2 cups liquid soap DIRECTIONS: Put 2-½ gallons of water in a large container, add lye. Stir until combined. Add the remaining ingredients and stir well for one hour.
0 Comments
Sourdough bread is delightful, good for you and not that difficult if you bake a lot of bread. If you don't it can be found locally from your farmer market bakers such as myself - Root Seller Sue. Shameless plug indeed. I did an online class in sourdough about six years ago. I recently found it on my YouTube channel and decided to make it public so anyone with flour and a little initiative can go for it. Without further ado. Please check out the videos on the home page by clicking here. With all the fast talking, you may need some questions answered. Here I am - just comment in the box below and I will get back to you as soon as possible. Stay home, stay safe and check on your neighbors.  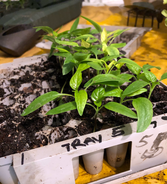 Oh joy of joy, my peppers look amazing. From out of their little sprouting box, they are being moved to fresh soil with room for roots to grow. It's Monday, March 16. Following up on my seed starting post, it's time to ensure the seedlings turned plants are given proper light, a little fertilizer, fresh air and lots of love. My garden begins indoor with these little plastic trays. Measuring about 10-inches square, I can plant seven rows of seven seeds for 49 transplants in a limited amount of space. Keeping those seedlings properly labeled has always been the bane of my existence, but not this year. This year I am attempting to keep my peppers labeled, so all my friends and customers receive properly labeled transplants.
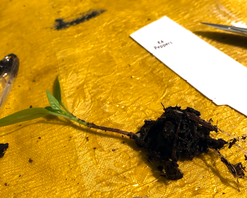
 It's also advisable to allow the seedings to "dry out" as it it much easier to get them out of their starting trays and cleanup of dry soil is really much easier than the wet clumpy stuff you see in the photo above. After transplanting and speaking words of love to my plants, I place the trays beneath full spectrum (one warm and one cool) fluorescent lights. As you can see there are two 48-inch shop lights chained to the bottom of my heavy-duty metal shelf. The chains allow you to keep the lights as close as possible to the seedlings and move them upwards as the plants develop. Because we have a cat that eats pepper seedlings I wrap plastic around the shelving unit and secure with clothes pins. So far that has worked, but only because I was home. We will see how many I lose to Walter in the near future. Or whether we lose Walter :).
Got QUESTIONS?
|
Sue B. Balcom
Writing, or maybe talking, comes naturally to me and under the guidance of a great newspaper editor I have acquired skills that led me to author four books. Archives
January 2023
Categories |


 RSS Feed